homeabout""fashiondiypr friendlylets chat
Showing posts with label Do It Yourself. Show all posts

Friday, January 27, 2012

Toasted Coconut Protein Bars DIY

The other night I made some protein bars and thought I'd share them with y'all. Ha... did you just see that country-ness coming from me? I've been in Tennessee too long.

Oh ya... Back to the protein bars. FOCUS Stephanie Focus! So they other night I made protein bars but decided to play with some ingredients to change it up. So I used my normal base that I got from a recipe that Jamie Eason posted Carrot Cake Protein Bars. I ALWAYS recommend trying out the original before making changes and deviating from the original. So try her recipe before you play around... because it is really good!

Ok. So here we go. I thought it would be fun to change up the baby food flavor, which surprisingly changes the whole taste, I know I should have thought this... but I didn't. And then I added some coconut too... which was AWESOME! I've since made this recipe again, changing and adding a few other things so I'll share those at the end of the post. I give you Toasted Coconut Protein Bars... I don't know what to call them... But there is toasted coconut so it makes sense to me.

Toasted Coconut Protein Bars:

Stephanie Drummond, fact this blog is awesome, homemade protein bars, DIY, do it yourself

Ingredients:


  • 4 egg whites
  • 3/4 cup Splenda, Truvia, or Ideal
  • 8 oz Apples and Cherry Baby Food
  • 4 oz water

  • 3 tbl Coconut (I used the baking sweetened kind which makes this not as clean as I'd like)


Directions:


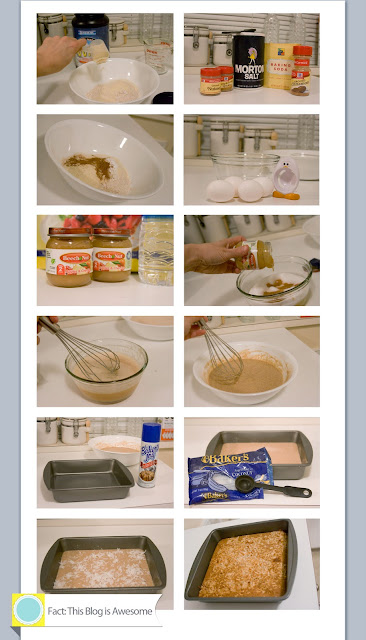
Preheat oven to 350 degrees.

Mix flour, whey protein, cinnamon, allspice, nutmeg, baking soda and salt together in a bowl.

Mix egg whites, Splenda, Apples and Cherry Baby Food and water (optional) in a bowl.

Add wet ingredients to dry ingredients and mix together.

Spray baking dish with non-stick butter spray.

Pour ingredients into dish.

Pour 3 tablespoons coconut over top of mix.

Bake 25 minutes, then turn broiler on high and then I move my bars up a level and toast the coconut.

Makes 16 squares, 2 squares per serving.

Stephanie Drummond, fact this blog is awesome, homemade protein bars, DIY, do it yourself


Ok. My changes this time around. I changed my coconut to the bulk kind you buy at Whole Foods. It's not sweetened AT ALL. My opinion. I liked it better, it was a lot crunchier on top which I really liked. I also added 1/2 tsp vanilla extract. I don't think I can tell a difference so I'll just omit that next time.  I also made a second batch today where I mixed the coconut in the dry mix and did not put it over the top. I don't like it that way as much. I really like playing around with this recipe. I think next time I'm going to add raspberries to it and maybe a tbl of vanilla extract and change up some of the spices.

xo, Steph

Wednesday, January 18, 2012

How to make Oat Flour | Quick and Easy DIY

So I was making my protein bars tonight and was out of oat flour and thought I'd share how I make my own.  It is super simple and tons of fun. Ok. Maybe for you it isn't tons of fun but I love using my coffee grinders and making it go ZZZIIIIIIIIIIIIIIIII.... I actually don't know how it sounds but that's my personal interpretation. Anywho... I know before I started the Jamie Eason LiveFit program last year that I had no clue how to make it. Premade Oat Flour is not very common in my area or its pretty expensive at Whole Foods, so I figure why not make my own. So much easier and soooo cost effective. Here you go folks. Hope it helps someone! :)

How to make Oat Flour

What do you need:

  • Coffee Grinder (preferably one that you haven't used to grind coffee it will taste weird)
  • Oats (I usually buy mine at Whole Foods, but only had the Walmart stuff hanging around tonight)


How to:
1: Pour Oats into grinder.
2: Make sure your grinder is set to the finest of finest. I have mine at Espresso and 4 cups. I have no clue if the 4 cups actually means something but I keep it there.
3: Turn Grinder on.  Mine auto turns off when its done. I didn't know this until the other night. But if yours doesn't, then turn it off when it looks fine. And not fiiinnnneeee as in Hot Dang but a fine grain. :)
4: Then its done. You have Oat Flour. Some say their grinder leaves their flour a little grainy, but mine makes mine super fine so it just has to do with your coffee grinder.

When a recipe calls for oat flour I grind the whole oats until they equal the amount of oat flour (ground oats)  indicated in the recipe. 

xo, Steph

P.S. Please excuse my messy blinds. I refuse to buy new blinds when they were supplied by my Landlord this way and I'm stubborn. :)

P.P.S. This post is actually intended for Dave, the hubs, because he always says he doesn't know how to make it. Now you know and have a place to reference in the future. hehe..

Monday, December 12, 2011

25 Days of Christmas - Day 11: Recipes - Peach Cobbler Protein Bars


I haven't chatted about this on here yet so why not today. On January 3rd 2011 I made a plan to lose weight and get healthy. So working out and eating well has been very important to me this past year. I did really well this year. I was super successful with my weightloss and I lost 45 pounds. I've kinda taken this past month off but I'm still trying to be pretty good with my diet even if I'm not hitting the gym so hard.  We know right now is the time of the year where we go to parties and usually they aren't super healthy. So here is a quick recipe that is super yummy and oh so good.

I’ve adapted it from this original recipe from Jamie Eason’s Cinnamon Swirl Bars to make a Peach Cobbler-ish Protein Bars. I kinda like making these and taking them to parties, in fact I'm taking them to my work party later this week, don't tell anyone... shhhh. No one knows they are healthy. They just think it’s a peach cake. Don’t tell them, and no one is the wiser. Hehe.. Hope you enjoy them, and definitely take a look at Jamie’s Cinnamon Swirl Bars, those are TO DIE FOR!


Peach Cobbler Protein Bars

Ingredients:

1/3 cup Splenda
2 tsp cinnamon
1 1/2 cups oat flour (I make mine, I use a coffee grinder and grind oatmeal until it's fine)
2 1/2 scoops vanilla whey protein
1 tbsp baking powder
1/2 tsp salt
1/2 cup Splenda
2 egg whites 
1/2 cup Skim Milk
2 4oz jars of peach baby food
1 1/2 cup frozen peaches (thawed)

Directions:


Preheat oven to 350. Spray an 9x14 inch Pyrex dish with non-stick spray.(I actually don't know what size it is, but look at the picture at the end and you'll see, or you can use a square pan, its really your choice. Just make sure your servings are correct)

Step 1: In small bowl combine: (set aside)
  • 1/3 cup Splenda
  • 2 tsp cinnamon

Step 2: In large bowl combine: (whisk together and set aside)
  • 1 1/2 cups oat flour 
  • 2 1/2 scoops vanilla whey protein
  • 1 tbsp baking powder
  • 1/2 tsp salt
  • 1/2 cup Splenda

Step 3: In a medium bowl combine: (whisk together & add to large bowl)
  • 2 egg whites
  • 1/2 cup skim milk
  • 2 4oz jars of peach baby food
  • 1 1/2 cup frozen peaches (thawed) – Do a quick chop to them

Step 4: Pour a shallow layer of batter into the loaf pan (about 1/4 of the batter).

Step 5: Sprinkle heavily with half of the cinnamon/sugar mixture. Repeat with remaining batter & cinnamon/sugar on top.


Step 6: Draw a knife through the batter to marble. Bake for 28-30 min. Let cool for 10 min. Bars will be dense.

Before they were cut.
Oooh Yummy Yummy!
Hope you try them and enjoy them!

xo, Steph

Tuesday, December 6, 2011

25 Days of Christmas - Day 6: DIY Glitter Pears


I found this pin on Pinterest but could never find actual instructions for how to make them.

Pinterest, Pumpkins, DIY,Do it Yourself, Martha Stewart

 Luckily I had just finished making these Glitter pumpkins from Martha Stewart so I had some ideas of how to do it so I figured why not try it. So on Thanksgiving my Mother in Law and I had a craft filled day. I just realized that I never photographed the rest of the stuff we made. Making mental note to do this. Also... I wasn't planning to share the directions on it so I didn't photograph it, I know, what kinda Blogger am I? For Shame! hehe... But honestly, its not really hard so you shouldn't need them.

Pinterest, Pears, DIY,Do it Yourself, Martha Stewart

Supplies Needed:
Fake Pears of assorted sizes (we found our in the floral area at our local Michaels and got the kind that were sold both individually - Large size and in a bunch - Small size)
Tacky Glue
Glitter of your choice
Foam brush
Newspaper

Steps-

Step 1 - I like to create little stations so I don't make a mess. For this project one station is a glue and wait station and the other is a glitter station.
Step 2 - Pour glue onto newspaper and dip foam brush into and "paint" glue onto your Pear.
Step 3 - Move to Glitter station and pour an obnoxious amount of Glitter ALL OVER your pear.
Step 4 - Let it sit with the obnoxious amount of Glitter on it for a few hours, then you can shake some of the excess glitter off of it. And the put it in your favorite bowl, vase or tabletop, mine would be sitting in a cute porcelain santa sleigh if I didn't have 2 kitties who like to play with the pears and glitter.

Things I would suggest: 

Apply extra glitter on it so that you don't end up with some "bald" spots like mine did, you know, the spots where you can still see the pear. You could easily fix this by making these in a well lit area.
You can use spray adhesive if you'd prefer, just be sure to do it in a well ventilated area. We would have done this, but had already used a ton of it earlier that day and to be honest I was tired of having sticky fingers from the spray adhesive.

That's it. Not too difficult at all.  Let me know if you end up making it!

xo, Steph

Monday, December 5, 2011

25 Days of Christmas - Day 5: Tip, Tricks and Techniques


Truth be told, I get stressed a lot. So I'm super susceptible to cold sores. I'm really good at telling right before I'm going to get one that I calm down and take some prescription meds and usually that will help. WELL Friends... this weekend I was stressed and it was cold, so I was running the heat a lot more than normal which dries up my skin and makes it irritable. But this past weekend I was in Knoxville for a workshop and to model for the workshop. Low and behold my little friend decided to show up cause I was stressed, modeling is a stressful thing and I was so nervous. I know I act all cool but really I was WAY nervous. I didn't have any meds, the Pharmacy was closed, and all I could get was my over the counter stuff. So first thing Sunday I went to the Pharmacy, picked up my prescription and stopped it, but it had already started to form. So it wasn't going to get worse, but it wasn't gonna be gone in 3 hours for my photos.  What was I to do? Well I didn't do anything. I went to the makeup gal, who was awesome and she taught me the most amazing tip ever. Now, I don't think I'd do this EVERY day that I have the cold sore. But what I would do is use this technique on those must hide it days, like my modeling gig last Sunday, and say... my husbands Christmas party (hopefully it will be gone by then, but you never know). Follow the instructions on the Liquid Bandaid, don't drink it, or eat it.  And do this at your own discretion.

How to hide a Cold Sore on the fly:

Supplies needed:
Liquid Bandaid
Abreeva (or something to keep it hydrated)
Concealer
Powder
Lipstick


Steps:
1- Look at your sad cold sore (image 1)
2- Make sure you have applied something to hydrate it before because you will not be able to add this after. Apply 1 layer of Liquid Bandaid (image 3). The package says you can do 2, but I'd recommend just one because it can make it bumpy which is what we don't want. We want a flat surface so that you can apply makeup over it. (image 2)
3- It looks a little shiny even after its dried (image 4)
4- Apply a layer of concealer. I tried to use my L'oreal stuff but it was a little to liquidy, so I tried my Smashbox stuff and that did the trick. I applied it with a sponge so that things stayed sanitary. I also applied a little powder over the top and around the rest of the mouth to try and keep the coloring the same. (image 5)
5- Apply some lipstick or your favorite gloss and go out for the night.

Mine lasted a good 5 hours before it became a little more noticeable. This may not work for you but it worked for me and saved me from looking like a hot mess.

Let me know if you end up trying this. I know this isn't the end all of hiding a cold sore but thought it was pretty neat.

P.S. Sorry for sharing my ugly cold sore, but I thought maybe this would help someone since I'd never heard of this.

xo, Steph


Friday, December 2, 2011

Under Eye Circle Quick Fix Tutorial


Thanks to L'Oreal for sponsoring my post about my favorite beauty looks, tips and tricks! Check out Makeup.com for beauty advice from the experts.

Although this is sponsored all the words and thoughts are my own... especially the goofy ones. You'll see in a few.

We all have those mornings, especially after those holiday parties. We wake up and EWWW we have dark under eye circles. Goodness knows I have them ALL the time. I have found a super awesome way to fix this. I can't take credit for this, not at all, I originally found this tip on Kandee Johnsons blog. She rocks by the way. Its a quick little tutorial so feel free to check it out on Youtube, I think she probably explains the WHY's a bit better but here is my version of it in photographs with my few little quirks and changes that I've made. P.S. I realize that mine aren't crazy bad in the first picture below but they usually are, I just got lucky and had a good amount of sleep the night before.


Step By Steps (day by day... please tell me I'm not the only one who watched that show):

Click to make it bigger if you want to see the detailed shots better of if you want to see my awesome pores.

Step 1: Smile at those under eye circles. (image 1)
Step 2: Find a concealer that you like. Personally, I use the L'Oreal Concealer in C 1-2-3, I prefer it because its not a thick concealer that feels gunky and heavy.
Step 3: Start applying dots, or streaks (image 3 and 4)of your concealer into a triangle from your inner eye going towards your nose then to your outer corner of your eye and then meet back up to the inner corner (see image 4).
Step 4: Blend your concealer into your skin (image 5). I usually blend it a little too much into my upper cheek bone but you will see why in a second.
Step 5: Look at how lovely that looks (image 6 - eye on the left has been worked on but not on the right).  If you use a thicker concealer do what Kandee does and use a second darker concealer over that same triangle to make it blend the color better. Like I said I use the 1 because it is lighter and not super make-upy so on me it looks more natural.
Step 6: Now lets get that concealer to stick, we just did all that work (ya know the 2 seconds to make a triangle and blend) and we want it to have some staying power. So take a sponge and press it onto a powder and press it under your eyes where you just put the concealer (image 7), I blend a little below to keep things matching.
Step 7: Take a little bronzer and a bronzer brush and add a little to under your eyes and into your cheek bones and all over (image 8). I do this to help blend the colors together and I don't look like I have a pale face and look like a Cullen.
Step 8: Grab your blush and blush brush and apply it your cheek and then a little above to kinda blend it a little (image 9). Not too close to your under eyes because you don't want to have red under eyes. That would be weird.
Step 9: Look at your pretty face. Image 10 shows 1 eye fixed (left) and one eye not (right).

Here is why I like doing this, because I can do this super quickly right after lunch and its just something that can be done in a flash. Wham Bam Thank you Ma'am!!! Please tell me I'm not the only one who says that.

That's it. Hope this helps some!

xo, Steph


I was selected for this sponsorship by the Clever Girls Collective. Click here to learn more about Makeup.com or become a Facebook fan by clicking here.

25 days of Christmas - Day 2: DIY Calendar

Diy, Do it yourself, Christmas, calendar, projects

Calendars are like one of my most favorite things ever. I have this bad BAD habit of buying between 4-5 different calendars. When Dave and I got together we combined our calendars, he's just as bad as I am, I swear we had about 10 of them and I'm not even exaggerating, so we decided that since we had no where else to put that we would decorate our entire bedroom with Calendars. We did not have any decorations, just calendars. So we always knew what day it was. Currently in my office I have 5, 2 hanging, 2 daily and 1 day planner dealy. I'm really bad at changing the daily ones, even bad at changing the monthly but by the 15th I've usually gotten tired of looking at the tiny calendar in the corner of the previous month that I change it and then the cycle continues. So when I get the chance to be crafty with my calendars I am excited. Monthly I get this printable calendar email from Scout Creative, but I never put them together because I'm at work and I don't have glue. Well people... this month was MY month, I didn't have glue but I didn't care. I printed that bad boy off and swore up and down, crossed my heart that I was going to do this calendar and it was going to look great.... WELL.... I'm not so sure that it turned out quite like theirs, but it turned out at least. Oh and they do these calendars monthly so sign up for their newsletter cause its fun to get these in your inbox.


Here is what you need:

  • Print off the Scout Creative Monthly calendar found here.
  • Scissors
  • Glue (probably a glue stick and not tape like I did)
  • Nimble fingers

Then follow the instructions that are on the print out. First of all, I'd recommend not using tape like I did. I swore I could get away with it. You can't. Now you know. Second, you should probably learn what Mountain fold and Valley fold mean. I didn't, I just folded it where ever I wanted. Probably not a good idea. Thirdly, is thirdly even a word (?), don't get discouraged when your fat fingers can't make the tape stick. Its normal I bet, but you shouldn't have the problem if you follow my first tip. Thats all my tips for you, here are some pictures I took while doing it over my lunch break the other day. There aren't many photos cause I made this on a whim and self timer on my phone = not so good and easy to work.

Diy, Do it yourself, Christmas, calendar, projects
Cut Cut Cut...

Diy, Do it yourself, Christmas, calendar, projects
Fold Fold Fold
Diy, Do it yourself, Christmas, calendar, projects
Nutcracker Head and Crown

Diy, Do it yourself, Christmas, calendar, projects
All finished... Now can I go eat my greek yogurt?

This is where it will live till the end of December... Or the middle of January.


xo, Steph

P.S. This isn't a sponsored post. I'd tell you if it was, its just a cool freebie project. Fun for the holidays.

Wednesday, November 30, 2011

An Outfit a Day - Day 30

Day 30 Daily Fashion - "I sooo want to look cute today." I thought to myself while getting ready. But today was a total bust. I thought I looked cute but then when I got to work, looked in the mirror I saw a frumpy looking old lady in front of me. My original plan was to wear this dress that I asked for at my grandmothers funeral. There were few things that I took that day, a few pieces of jewelery (she had a knack for beautiful costume jewelery) and some china, but that dress, that dress was something I loved. I've worn it all of once but I spilled on it... like a lot, and then forgot to dry clean it. So last week I took it to get cleaned, only took me 5 years, and got it back on Monday. I wanted so badly to wear it today but honestly, I don't think the accessories I have would do it justice. Its not a fancy dress, but because it's my grandmothers I have this idea in my head of how I want to wear it, and what I have to wear with it is not what's been envisioned. So instead of that dress I just built you up about, I wore this casual and kinda frumpy outfit. I should have at least worn boots, but I didn't. And you don't get to see my shoes, cause they aren't as cute. :)

Top: Express, Sweater: H&M, Jeans: Target, Shoes: Target (not shown, they're cute just not with this outfit)


So today is it, the last day of the month and the last Outfit of the Day. :)

xo, Steph

Tuesday, November 29, 2011

An Outfit a Day - Day 29


Top: H&M, Skirt: H&M, Tights: Target, Shoes: BCBG
Day 29 Daily Fashion: People... its cold out here. Like 30 something degrees. I didn't even have my coat on for these photos. I wanted to cry. Enough complaining ok. So I saw this skirt online at H&M and knew when I went there for Black Friday that I HAD to find it. I've been wanting a pleated skirt for a while, but always forget when its actually time to buy clothes. So while at H&M I almost forgot AGAIN until I did my 2nd round of searching. They have it in Hot Pink but thats just a bit much for me, I'm loving this in gray. AND it was only $12.95, it was the only regular price thing I picked up.  So ya... Thats my outfit and my complaint about the weather. Tomorrow is my last outfit for the month. Hmm.... what am I going to wear. I should make it a good one.

xo, Steph

Pinterest Pretties - Christmas Gift Giving and Making Edition

We all have them. Those Pins we pin on Pinterest that we mean to make but never do? I know I do. I have over 700 things pinned. I keep meaning to make them. I actually have made a few, which is for another post, but these right here, these are the Pins I keep pinning and want to make as gifts... for Friends. So friends, if you're reading this, you may want to forget you have read this because I'm going to be showing some Pintrest Pretties - Christmas Gift Giving and Making Edition! I feel like that should be said in one of those Smash Car announcer voices.

So first up I have found the greatest gift for that friend who loves coffee. Why not make them something fun for their coffee. That's right people, I'm bringing you Elsie from A Beautiful Mess' Make Your Own Coffee Syrup. I have an idea of who this is going to be gifted too, and I know they will love it, especially with all that coffee they drink.

Pinterest, Christmas Gift, Christmas, Coffee, DIY, Do it yourself
Image Courtesy of A Beautiful Mess
Next up is not a Do it Yourself-er. Its orginially from Etsy, and I know you could buy it, cause that's way easier to do. I know I'd rather do that, but I'm on a budget here peoples, I have to find ways to be cheap... er... homemade with love. :) So I give you the cutest little boys shirt ever. A t-shirt with a little vest and tie. So cute!  You can buy one from this shop or try to figure out how to make it yourself. I bet a little google (or swagbucks in my case cause I like earning free gift cards) search would find a pattern of sorts. I think a few of my littlest Nephews might like this... I mean I guess my 14 year old Nephew might, but I probably wont make him one... cause he's way too cool for me. hehe..

Pinterest, Christmas Gift, Christmas, shirt with tie
Image Via Rock N Rags on Etsy

I know a super awesome co-worker of mine who might like some homemade bows.  No directions on how to make this, but I think there was once a tutorial on A Beautiful Mess on hair bow making.... Oh yes.... here it is.

Pinterest, Christmas Gift, Christmas, Bow, Bow tutorial, DIY, Do it yourself
Image via Pinterest - I don't know where it originated from

I don't actually know someone who would want this. I know I do. So maybe this could be your gifty gift for me. Otherwise I will probably make it. I bet it would have been cute with my outfit today. Sigh... Oh well.. Guess I'll be making it soon.. Heheh... Peter Pan Collar. How cute! So cute! Love it totally!!!

Pinterest, Christmas Gift, Christmas, Peter Pan Collar, Collar, DIY, Do it yourself
Image via Honestly WTF

Apparently everything I Pin on Pinterest comes from Elsie at A Beautiful Mess' blog. Because the next thing is a DIY Canvas. So My best friend got married this past year and I'm trying to give her a gift from my heart. My heart being my frugal-ness and total craftiness.

Pinterest, Christmas Gift, Christmas, Canvas, DIY Canvas, DIY, Do it yourself
Image via A Beautiful Mess
 
This last one is a super easy easy EASY DIY project and such a necessary one. Its a super cute survival kit using pot holders. I think my sister and sister-in-laws could totally use these since they all have boys and lets just be honest... Boys are messy. Its a FACT!

Pinterest, Christmas Gift, Christmas, Gift for Teacher, Friend Gift, Survival Guide, DIY, Do it yourself
Image via Tidy Mom

Alright Friends.... That's it for this weeks Pinterest Pretties. Hope you liked them and got some ideas of your own. As always, feel free to follow my Pinterest Boards, and let me know about yours so I can start following your board!   Follow Me on Pinterest

xo, Steph

Monday, November 28, 2011

An Outfit a Day - Days 26, 27 and 28

Day 26 - Jacket: Target, Dress: Macy's, Tights: Target, Boots: Target, Belts: Target and Forever 21
Day 27 - Sweater: H&M, Shirt: Express, Jeans: Target, Boots: Target
Day 28 - Jacket: Target, Blouse/Dress: Bouchique, Jeans: H&M, Boots: Target
I'm a dork. Oh and did you notice the new red in my under hair? I love it!!
 
Days 26, 27, and 28 Daily Fashion - So I'm way behind on my outfit blogging. Being busy has done it to me. Yesterday we decorated the house and by the time I remembered to take my photo it was 4:00 and super dark because of the rain. Ugh. So the photos are blurry. And on Sat it was so windy that I couldn't get a good photo so I used my camera and took it while at Target. hehe... And then today... Well today it was raining but I set up my Tripod and took my photo under a street overpass/bridge dealy by my work. I think they turned out ok.

Hope you all are having super great days!!!

xo, Steph

Tuesday, November 22, 2011

Pinterest Pretties - What I Like Edition

Random things I like from Pinterest this week. Yippee!!!!!


I want a picture of me like this:

taylor swift, pinterest

I really like these lace vintage looking packages:

packaging, pinterest
package, pinterest

Love this Sign!

design, artwork, pinterest

I love these mugs and I kinda need them!!
animals, mugs, etsy, pinterest

I'd like to think that Pickles or Mustardstilskin might like these:


That is all!
xo, Steph

Thursday, November 17, 2011

Pinterest Pretties - A Collection of Christmas Crafts

I don't know about you but I love love LOVE Pinterest.  I'm know I'm not the only one who is highly addicted to it. It's been a major inspiration for my outfits of the day, for craft ideas, food ideas, pretty much its been an inspiration for everything. Last weekend my Mother in law and I went to Michael's and scoured the store for supply products from my Christmas DIY board. I had about 5 or 6 things I wanted to make, but some of these projects get pricey. Sure my Mother in Law is awesome and she paid for my crafting supplies but there are just some things that even I wont let other people pay for. :)  Anywho... Here are the projects we're planning on doing on Thanksgiving for our fun Christmas Decor.

Glitter Candles with Double Stick Tape: This looks super easy and really rad. You can't go wrong with Tape and candles. Not sure if I will light mine but who knows. We got white candles, and I think I'm going to use this really pretty green glitter on them.


Glitter Pears : These seem pretty easy to do too. We bought some fake pears and some silver glitter. I already have tacky glue and I'm planning on following the same tricks that I did with my Halloween pumpkins. That idea can from Martha Stewart, and I'm just gonna change it up a bit.  EDIT: I made a little tutorial on making these. Check it out here.


Christmas Subway Art and Glitter Trees : So we're not making the sign. I am, but MIL wont be. I love this blog because they posted the download link for that sign, and I've already got a frame that I'll put it in. Now comes the fun part. GLITTER TREES!!!! Here is the DIY (Do it yourself, for those who don't know what that means, we all do but I wanted to sound fancy) ha!  I can't wait. Hot Dang those little Styrofoam cones are expensive! FOR REAL! That was one of those moments that I was glad I wasn't paying... and that I had a 20% off total purchase coupon.

Here are some things we aren't going to make, but I still want to.  I'm doing a craft day with one of my best girlie friends next week so maybe I'll try to do some then.

For sure I'm going to make these:


Maybe I can make this:

I already made one of these (the one of the top left) I still need to add one thing to it then I'll be done.


This is super adorable and I totally want to make it.


Those are all the crafts I want to make. I can't wait to actually try to do some of them. I'll take some photos when I'm done. Oh and if you want to follow me on Pinterest you totally can. I have lots of pins that I think are super rad!       Follow Me on Pinterest

xo, Steph
Related Posts Plugin for WordPress, Blogger...